This page has been archived and some links may not work correctly anymore. No updates of this page will be done anymore.
How to repair a HP 100LX, 200LX or 1000CX Palmtop
Contents of this page:
- Introduction / where to let the palmtop repair
- Broken latch
- The hinge crack
- The hinge is too tight or too loose
- The screen: Missing pixels and other problems
- Some or all keys of the keyboard don´t react anymore
- Other case cracks
See also: Tutorial: Disassembly of a 200LX
Introduction / where to let the palmtop repair:
This page is intended to give you advice if your HP Palmtop is broken.
If you want to let your palmtop repair professionally, you have two options:
- Thaddeus computing in USA repairs palmtops for a flat rate, regardless of the defect. They have excellent service and turnaround time, you even get warranty on the repaired device. They also buy used units.
- Another option for you is to use my repair service. Please contact me to get an individual offer. It helps, if you describe the defect as detailed as possibile in your first email, ideally providing photos or a video showing the symptoms of the defect
In case you decide it is not worth to repair the palmtop anymore, please do not throw it away. It certainly contains valuable spare parts. In that case, please submit an offer for me to buy this machine.
If you need advice how to repair a palmtop yourself, read on:
Of course I cannot cover every imaginable defect, so I´ll describe the most common problems and the problems I´ve had myself. Since HP discontinued the 200LX palmtop, it becomes more and more important to repair broken units, because it will be difficult to find used units in good shape.
For some of the repairs, you should be familiar with opening the palmtop´s case and taking it apart. For some repairs you even have to take the screen out of its shell. So if you have doubts, rather ask a friend who is able to do this quite complicated job for you.
Warning: You can take almost the entire palmtop apart, you´ll get it back together if you know how you took it apart. But there are a two exceptions:
The right hinge and the screen:
1. The right hinge: Don´t ever take the right hinge apart! Don´t remove the metal ring that holds the hinge together! You probably won´t be able to reassemble it, and that would result in a nearly unusable palmtop! If you want to remove the screen, you can do it leaving the hinge intact. Remove the four Torx-6 screws and carefully bend the screen part of the case apart and take the screen out of it. The screen is only lying in there, no additoinal screws, and the electric contacts are only pressed onto the screen by the two case screws on the left side which you have already removed.
2. the screen itself: If you have taken the screen out of the case, the only thing you can do is to separate the electronics board from the LCD by bending the little metal latches away from the circuit board. But don't ever remove the flat cable that goes from the electronics board of the screen to the LCD glass! That would let the screen die forever! Additionally, it is very difficult to get both screen halves back together; it is a matter of 1/10th mm! SO rather avoid that.
What you will need when doing your first repair job, is advice about opening the palmtop. I have written an article about the process of dismantling the palmtop. There is another source for advice for this:
This email address is being protected from spambots. You need JavaScript enabled to view it. wrote a page with instructions guiding you through the process of opening the palmtop and even doing hardware upgrades. Click here to read these instructions.
Let's now talk about the actual repairs:
Broken latch:

The latch which holds the case closed if you put down the screen lid gets easily broken. What breaks is not the latch itself, but very thin plastic springs that are responsible for the latch to flip into its original position after you pressed it to open the lid.


It is nearly hopeless to try to glue the spring back to the latch. It will break again sooner or later.
But there are some ways which enable the latch to work again.
1. Use a piece of a rubber band and sqeeze it into the gap under the latch. Maybe cut ittle triangles out of the rubber band, so that it is not so strong.
2. The solution I chose: A drop of silicone, which is actually used to make tight the gap between your bathtub and the wall, will do the job very nicely. You can use a screw driver to work the silicone into the gap under the latch, Just be sure to wipe away any silicone that remained outside. Let it become hard 12 hours with the latch fixed with adhesive tape or something like that, and voila: You have a working latch again.
3. Also a small piece of foam rubber (abt. 13mm * 8mm and abt. 1-2mm thick) can do the job very effectively. I have one palmtop repaired this way, too. Looks not as ugly as the above solutions and works very well.

The hinge crack:
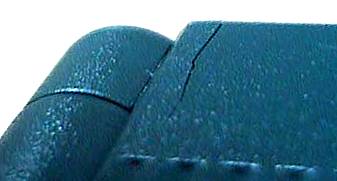
Sometimes the case right above the right hinge of the palmtop breaks due to the strain if you open and close the palmtop frequently. This type of defect is typical for the HP 200LX and appears quite often. It is usually called the "hinge crack". The hinge crack is forced by a hinge that's too tight (See next item!)
Some people simply wait until the crack is wide enough and then put a little(!) drop of superglue or epoxy glue into the crack. That seems to work if you use very good glue.
However, the chance that this fix breakes again is big. There are other approaches, Alan Striegel used a small metal plate to reinforce the hinge, his results are shown on his home page. I have also tried this approach and so far I can tell it seems to be very reliable:

A nice 100LX user, Thomas Mahoney Jr., provided the method he used to successfully repair his hinge crack:
After using 2-part epoxy to reglue my broken hinge halves, I test fit the spring to make sure it was going to fit. Use an X-acto knife to smooth out the epoxy that may have entered the inner hinge area. CUT the hinge spring to about 75% of its usual length with a pair of diagonal cutters, so that you do not need a lot of force to compress the black ring onto the plastic hinge halves. Once all of the hinge pieces are in the correct order and in the hole, I used 2-part epoxy to glue the black ring onto the repaired hinge. The epoxy also acted as a "rubbing" dampener, that is, it makes it harder for the display to flop/fall down since the friction of the epoxy in the area of the right hinge against the hinge tube. The epoxy on the outer hinge also makes it harder for the hinge cap to come off and tightly grips the hinge assembly. Once the epoxy is dried, you may have to use an X-acto knife to cut away undesired epoxy that may be blocking the hinge tube from going back into position and/or cut epoxy away from the outer hinge so the hinge cap can slide on. I had to cut the hinge cap open slightly in order to make it slide onto the hinge. The hinge works good. I actually needed a drop of lubricant to loosen it up slightly after this repair.
Thanks for the dismantling guide. It's great!
Have a great day,
Tom
The hinge is too tight or too loose
If either the hinge is too tight (danger of hinge crack) or too loose (screen falls slowly back while you are working), you may be able to fix that (it does not always work!):
Remove the cap from the right hinge (only the right hinge contains the mechanics). You can do that by carefully prying it off with the nails of your two thumbs while the screen lid is opened with an angle of 90 degrees to the keyboard.


What you see then is a metal shaft in the center and plastic parts around it. The hinge consists of a spring which presses a little plastic cone onto a metal ring (which is on the side you cannot see because it's in the tube). The black plastic you can see directly around the metal pin is the back side of the spring with its plastic anchor. Now you have to adjust the friction of the cone to loose / tighten the hinge. You can do that by using very little amounts of either a lubricant (to loose) or Isopropanol alcohol (to tighten the hinge). Use only a very little drop of the lubricant and work the hinge a few times by opening and closing the lid. Of Isopropyl Alcohol you can use larger volumes. I suggest to use a syringe to apply the lubricant or alcohol.
Caution: Some people reported problems with some lubricants which seem to attack the plastic material! WD-40, for example, must never been used! And remember: Don't ever take apart the right hinge, except you know exactly what you're doing!
The screen: Missing pixels and other problems (and: Doublespeed upgrade!)
If you don´t see anything on the screen, as if the batteries were dead, but you know they aren´t, it is most probably not a screen problem. It may be a software problem. Take out all batteries, press the On key for a few seconds, then let the palmtop alone for 24 hours (so all electricity can vanish). Then put the batteries into the palmtop again and see if it works now. If now, it may be an electrical problem.
If the screen shows weird characters on boot-up or if the screen contents are shifted by about two columns to the right and the two left columns show flickering nonsense, the screen is not defective, but your palmtop is double-speed upgraded! To make things look well again you need a driver. If the double-speed upgrade has been installed by Times2Tech, use the driver by Mack Baggette. The following picture shows a typical double-speed-without-driver screen:

It can sometimes be much worse, so that even the characters are not readable anymore.
To be sure you have a double-speed upgraded palmtop, you can also enter the self-test mode of the palmtop (only if the screen is readable, otherwise you cannot read the self-test output!) using Esc-On to switch it on instead of just On. Then do the "Timers" test. If the test is not successful, the palmtop is upgraded. (Warning: Never do the RAM-Card test if a flash card is in the slot, this test is only for SRAM cards and can destroy other cards!)
If you look through the backup battery tray, you may see if a double-speed crystal is installed. If on the silver cylindrical component behind the tray is written 158 CP52, it is an original single speed palmtop, if you see F31.673, the palmtop has been double-speed upgraded:

If you see nothing written on the crystal, you either have to open the palmtop to read the crystal model number, or run the built-in timer self-test: Press Esc-On to switch the palmtop on, and if you can read the screen well, go to Timers test and press enter to execute it. If it fails (output: time bad), probably a double-speed upgrade is installed. If you cannot read the screen at all due to strange characters, you can be quite sure that a double-speed crystal is installed. Load the above mentioned driver and the screen will be readable again.
If lines or blocks of the screen are missing, flickering or black, or if the whole screen is black or white, there may be a defect.
There are various typical scenarios which I try to describe here. It heavily depends on the symptoms where you will most probably find the problem:
If the whole screen turns black or white, flickers wholly or block-wise, or something like that:
Maybe only the contacts between the screen cable and the screen itself are loose: Switch the palmtop on so that you see a picture which lets you see problem and press on the area marked in the picture below.


Does that fix the problem temporarily? If yes, you should pry off the screen cover on which is written "200LX" and so on and then fasten the two Torx-6 screws on the left side of the screen. If the screw fastening is not enough, you can probably use a few layers of paper to make the pressure contacts under the screws stronger. If these contacts aren´t the problem, maybe the cable which connects the screen to the motherboard is damaged or not properly attached to the motherboard connector.
If you have missing pixel lines (rows or columns), but if only every second column in a certain area is missing
(e.g. as you can see on the picture below) this is most probably caused by IC contact problems. Since all the mechanical stress when opening and closing the LX is only applied on the right side (because only the right hinge contains the relevant mechanics), mostly contacts on the right side are affected, and these are responsible for the columns of the right part of the screen.
A failure of that kind can look like this (type "On" and the slash "/" to invert the screen, so it becomes obvious which lines are missing):


I was able to fix such a screen durably by resoldering the pin rows of some of the SMD ICs on the screen´s circuit board which have become loose.
The following pictures show a removed screen module with the ICs on the back. There is no way to tell without tests which of the pin rows may be loose. You have to try that by connecting the screen to a motherboard and pressing gently onto some ICs and their contacts or using a small screw driver to short-circuit the contacts one-by-one carefully while you observe the screen. Please note that you should use real SMD soldering equipment (a soldering iron blowing hot air), otherwise you need an extremely sharp soldering tip and a very calm hand.


Here you can see the principle how the ICs are wired on the other side of the circuit board (so you can understand which columns depend on which IC contacts):

However, if you have a screen which looks like this on the back:

You are out of luck, because these kind of screen has the ICs on the other side of the PCB and if that wasn´t bad enough, these ICs are fully covered and don´t have any legs which can be resoldered. But on the other hand, these screens are probably much less prone to this kind of failure. Another problem may be a too loose pressure of the screen glass to the conductive rubber band which connects the circuit board contacts to the contacts between the screen glas layers. But that happens only rarely. This can be fixed, too, but I only recommend that if you have good fine-mechanical skills and if this screen is not your only one - you could damage it forever with the following procedure:
There are metal latches which press both screen parts together. A pair of such latches is marked on the following picture:

You can first try to fasten these latches in the area where pixel columns are missing. If that doesn´t help, you have to separate the two parts of the screen and clean the contacts of circuit board, rubber band and the glass contacts carefully with alcohol and then reassemble it. The reassembling is tricky, because you have to place the both parts horizontally exactly as they were before you separated them, otherwise the contacts of circuit board and screen do not fit. Although the metal frame helps with that, you cannot rely entirely on that frame.
First, bend the metal latches straight so that they don´t press the parts together anymore. Take care the you do not break one of the latches.
Now you can remove the entire metal frame in which the two parts are embedded and pressed together.
Don´t separate the LCD from the circuit board yet, but apply some markings on the rubber bands and on the side of the circuit board, so you can later adjust them horizontally 100% precisely again.


Then carefully seperate the two parts, but note that they are still connected by a conducting adhesive tape on one side, this is for the horizontal lines and cannot be removed, otherwise you damage the screen permanently and make it totally unusable! Also make sure the white rubber bands remain on the LCD glass. This makes it way easier to reassemble the screen later. The following pictures show an opened screen:
Screen with metal frame still mounted:

Screen with removed metal frame: You see the white conducting rubber bands on the long sides and the yellow conducting adhesive tape on the short side.

Seperated screen parts: Do never remove the yellow conducting adhesive tape (actually a ribbon) on the short side and be very careful with it! Do not apply any force to it!


Now you can carefully clean the thousands of contacts on the circuit board and on the rubber band. Lift the rubber band only in these areas from the screen glas, where columns are missing, and clean the contacts there, too. Then reattach the rubber band to the glass and reassemble the whole screen. Take care you adjust the two parts horizontally exactly the same way they were adjusted to each other before, otherwise you will not get a valid picture, if you will get one at all! Many missing columns in a pattern which looks like an interference pattern can be the result.
Be sure to bend the metal latches again so that the two parts are pressed together with appropriate force.
If a block of consecutive rows or a single row is missing:
This can be caused either by bad IC soldering contacts, or (which is the worse case) by a defective ribbon cable - the yellow one on the right short side, which connects the LCD glass body to the circuit board of the screen module.
First try to find loose IC contacts, as described above. If that is not successful, take the screen module apart as described above, prepare a flat iron (highest heat level), put a bunch of paper strips under the contact row of the LCD on the right, where the yellow ribbon cable connects, to support the LCD glass mechanically, then press the flat iron gently onto the ribbon cable, moving it slightly, to melt the plastic and glue a little. After a few seconds, remove the flat iron and let the screen get cold again. I was able to fix some screens using this method. But it is risky, if you apply too much heat to the ribbon cable, it may be damaged permamently. In case this didn´t fix the problem, try the same on the contacts on the other side of the ribbon cable (on the circuit board).


Some or all keys of the keyboard don´t react anymore
Most likely the pressure contacts which connect the keyboard to the motherboard are not pressed strongly enough against the motherboard. These contacts are placed in the area under the menu key, the right shift key, the zero key and the dot key. Try to press the two parts of the palmtop´s shell together in that area and see if that fixes the problem.
If it only fixes it temporarily, you should try to fasten the screw under the plus key (from the bottom of the palmtop).
If that also doesn´t help, it may be necessary to clean the keyboard contacts to reduce resistance between the two contact counterparts. For that, you´ll have to open the palmtop. Click here to read how to do that. Be very careful when cleaning the keyboard foil contacts with alcohol or any other solvent. The contacts are build by a thin graphite layer, which is easily rubbed off using solvents. Clean them only once, and with only slight pressure with a soft tissue and some alcohol. Don´t worry about the black stuff rubbed of the contacts: It´s probably no dirt, but the graphite itself. So do not rub until no black stuff is rubbed off anymore!
The contacts on the motherboard can be cleaned as usual, using isopropyl alcohol and a tissue. These contacts are made of copper, so they cannot be rubbed off using a tissue.
Other case cracks
The hinge crack is by far the most common crack which appears on the case of the LX. However, there are a few more positions which the case breaks easily at. For example the little plastic "bridge" on the back between the battery cover and the keyboard part of the lower case shell:

I have no idea how this can be fixed the best way. I would try to take the shell apart, put epoxy glue into this crack, wrap it with adhesive tape until the glue is hard, remove the adhesive tape and then reassemble the palmtop.